Laundry Room
Project
(Final
Edit:
Expenses:
|
Description |
Store |
QTY |
Price |
|
|
A-Boy
Supply |
1 |
$338.95 |
|
Sink
strainer, chrome |
A-Boy
Supply |
1 |
$24.95 |
|
Grohe
Ladylux Café faucet and 10” Escutcheon plate |
Faucet Depot
(E-bay) |
1 |
$326.92 |
|
Wonder
Bar |
Home
Depot |
1 |
$7.97 |
|
Diamond Cabinet,
|
The
Cabinet Broker |
1 |
$284.00 |
|
Plumbing rough in including
parts and labor |
RD
Plumbing |
1 |
$343.70 |
|
Drywall (2 pieces just in
case) |
Home
Depot |
1 |
$2.02 |
|
Monocibec Cotta Etrusca, Vieo,
Tile, 90 sq ft |
Taggart’s Home
Interiors |
90 sq
ft |
$436.50 |
|
Misc
supplies (lumber, nails, joists, etc.) |
Lowes |
|
$54.88 |
|
Misc
supplies (blades,goggles, coveralls, gloves,etc.) |
Home
Depot |
|
$37.21 |
|
Misc
supplies (nails, etc.) |
Lowes |
|
$12.26 |
|
Misc
supplies 3 receipts (wood, nails, screws, etc.) |
Home
Depot |
|
$188.95 |
|
Misc
supplies (liquid nails, joist hangers, bolts) |
Home
Depot |
|
$52.34 |
|
Tile
Installers |
Ted
Ashkar Tile, Inc |
78 sq
ft |
$660.00 |
|
Counter Top (Flat lay.
Wilsonart Tawny Legacy) |
Precision
Countertop |
|
$98.55 |
|
Misc
supplies (paint, toggle bolt, paint tray, etc.) |
Home
Depot |
|
$28.05 |
|
Misc
supplies (grout seal bottle, washer hoses) |
|
|
$26.87 |
|
Flanaged 1 x 1.5 inch pipe 16”
long |
George
Morlan |
1 |
$1.35 |
|
Plumbing P-Trap kit and tube
cutter |
A-Boy
Supply |
|
$10.60 |
|
Plumbing hot/cold extensions
and compress union |
A-Boy
Supply |
|
$11.26 |
|
Misc
supplies (puddy, tape, stop, wrench, ball stop,
etc.) |
Home
Depot |
|
$52.81 |
|
Light
Fixture – Future purchase |
|
|
|
Total Cost: $3000.14
The $3000 Laundry Room Remodel
Story:

Figure 1 - Laundry Room in Dec 2000 – No utility sink,
ugly linoleum
I began the
laundry room project on
What is it
going to take to complete this project I though scratching my head. Let’s see.
Well, my goal is to have a laundry sink. And not one of those cheap ones. I
wanted a good one. So I researched and researched some more by surfing the web.
I came upon a very nice one made by Kohler. The
I saw the
sink at A-Boy Supply here locally for a good price so I decided to take the
plunge. I liked the faucet they had on the sink so I did some research and found
a new one on E-bay for a little bit less money ($326.92 shipped instead of the
$399 price at A-Boy). Wow, I never expected to spend that much on the faucet! I
was expecting more like $150.
Well, if
I’m going to put in the sink I might as well change out the linoleum which was
quite old and ugly looking. I figured, tile would be nice. As I dug into the
project and did my research I found that my floor, which consisted of 8”x4” joists placed 48” on center with
2”x6” tongue and groove planks for a sub floor is not good enough for doing
tile. There will be some deflection. And to fix this problem means I will need
to do additional prep work. Ripping down about 100 sq ft of insulation and
putting in some extra support. Not something I look forward to doing but I think
I’m up for the challenge now after talking with a co-worker and some others. It
will make the project drag on a bit more though. So, probably will take until
the end of the month or longer before I have a tile floor
installed.
I spent
about 1-2 hours a day over the last week of June removing the linoleum floor and
particle board underneath. I took the floor down to the tongue and groove planks
using a circular saw, hammer and this wonder bar pry bar (critical to
have).

Figure 2 - Begin sub floor removal

Figure 3 - Sub floor removed
In prep for
the plumber I opened up part of the wall where I will want to plumbing to go for
the utility sink. I will still need to remove insulation and cut a crawl space
hole (temporary) to help make the process a little easier for the plumber and my
sub floor work.
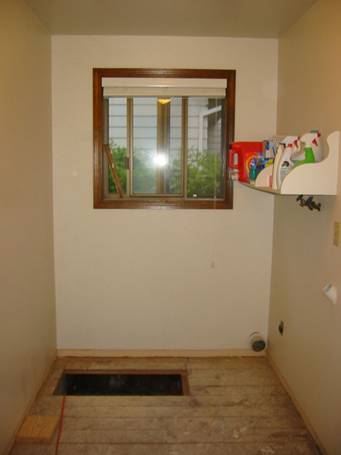
Figure 4 - New crawl space hole
So a mole
hill has turned into a mountain with the amount of work that this project is
going to require.
I spoke
with one tile person and they will set the tile, do the grout and put down the
wonder board backer for $12 a square foot. I was expecting a bit less but I
wasn’t expecting them to want to put down the backer board. Not sure if that is
the way I will go but it does cut down on my tool and expense cost by perhaps
$100 but I expect they are charging 2x what I can do it for (minus my time).
Other
decisions I have to make about the laundry room: What color/size tiles, laundry
room sink base, counter top, paint color for walls. I’ve thought about each of
these and expect to go with a caramel, or terra cotta or beige style of tile.
Maybe 8 or 12 inch. The sink base is looking to cost about $400 which is a bit
more than I expected and has a 6 week lead time! The counter top will probably
cost $150 and has a 2 week lead time. I expect the tile to cost about $3-4 a
square foot. Amazing how all the cost adds up. I was expecting this project to
cost about $2k but I may be more like $3k for the laundry room remodel. Amazing
how the cost goes up and up.
The tile
guy is out until mid August. Yes, about 6 weeks. Another wow. Amazing what I’m
finding out as I dig into the project a little more.
Unfortunately for me most tile
stores are only open during my normal working hours. So, I’ll have to take some
time off to go and select my tile. Maybe pick a store or two and find something
I like then buy 80 sq ft or so.
Right now,
I’ve got to think about what supplies I will need to sure up the sub floor. I
will do this after the plumber completes his work.
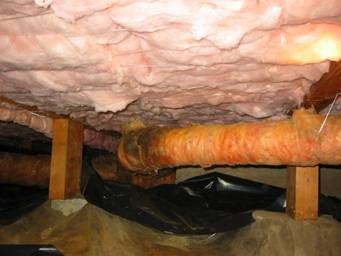
Figure 5 - Underneath sub floor (48" OC Joists)
That will
put me towards the end-middle of July when I can get the tiling done. At the
earliest depending on availability. Maybe that six week sink base lead time
won’t be so bad after all. Until then I may not be able to do my laundry!!! Ugh.
Or I will have to go to laundry facility to do my clothes which is something I’m
not looking forward too.
Plumbing –
It took about 1 hour and 20 minutes for the plumber to do the waste trap.
Working at a good pace. The plumber then had to get some supplies which too
about 30 minutes (off the clock). He returned and finished the rest of the
hot/cold piping within one hour. Arrive shortly after
Prior to
the 9th after I got the sub floor ripped up and before the plumber
came I worked on removing all the insulation and put up two joists. This gave me
an idea of what it was going to take to get moving on the project. Course the
whole joist support is being done to support tile which I hope to have laid down
in a couple weeks.
I put up
two of the joists with standard 10d nails recommended by the Joist hanger
manufacture. Course, it will work but won’t support as great of a load. I spoke
with a co-worker, Chris C., and he suggested 16d sinkers (3 ¼” nails). So, I
decided to buy and use them for the rest of the project.
On the
evening of the 9th, Chris dropped by after work to help me with
putting a couple joists into the cement. We applied construction adhesive and
bolted these up using 6 masonry bolts for one board and 7 for the other—each
board was about 5 foot in length. We also used two nails from the Ramset Chris
brought. It took about an hour and a half to get this all done. Was great to
have Chris helping. He was extremely quick and knew exactly what to do. After we
got the joists nailed and bolted into the cement Chris left and I decided not to
do any more work that evening. Figured I get some rest for all the work I’ll
have to do tomorrow.
Got a call
just after
The bill
for all the supplies is adding up, and I’ll need to get out the calculator.
Perhaps two to three hundred dollars in wood and various other supplies needed
to rebuild the sub floor. Wow, amazing how such a little project can turn on its
end and cost a lot more than what was expected. But, I’m committed so no
quitting.
About a
hundred and fifty bucks later—each sheet of ½” exterior grade plywood A/C was
$32.25 each and I needed three of them—we were loading up the truck.
At about
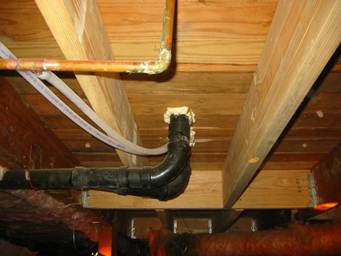
Figure 6 - Sub floor strengthened to roughly 14-16
OC
I finished
building and placing all the joists where I wanted them—basically so the entire
floor where the tile would go was support 16-18” on center with joists. I also
nailed down the 2x6 tongue and grove plywood to the joists. After doing that I
could definitely notice an improvement in the floor and it being much sturdier.
It may have
been after dinner that I began putting back the insulation. Oh, what a project.
If I wore glasses or goggles then they would fog up and I’d have trouble seeing.
So, after doing some insulation I had to take a break, take out my contacts,
rinse them and put them back in. That helped a lot and I was able to continue
the project after that with only little eye problems and occasional goggle
usage. I used a shop-vac to take up some of the wood debris left by the plumbers
drilling. I also cleaned off some dirt on the black paper.
Putting
back the insulation required re-cutting almost ever piece to fit in the new
joist slots. Then I stapled it some or just pushed it up and used the twine and
staple gun to help hold it in place. Or rather, keep it from falling down beyond
the twine. Seemed to do the trick for the most part so I stuck with it. This is
similar to the method the insulation installers used but not nearly as good.
They have better equipment and a much better staple gun.
I got close
to being done around 8 or

Figure 7 - Crawl hole nailed down
This was a
tough job. My respects to people who do this type of work for a
living—insulation and even the joist/framing stuff. Course doing it in the crawl
space made it that much more difficult but either way it isn’t an easy
profession.
I got what
I wanted to accomplish on Saturday, leaving the plywood floor stuff for Sunday.
So, I finished the day according to plan.
Got started
around
After lunch
I began measuring the floor for cutting of the plywood. I had three 4x8 sheets
of 15/32 inch plywood (about ½”). A couple sheets I had to cut again to make
sure they fit properly but within a couple hours I got it all done and
everything laid out ready for gluing and screwing down.
I used some
liquid nails sub floor glue and a screw about every 8 inches—which is a ton of
screws. I tried to leave around 1/8 to ¼ inch spacing between the walls and/or
plywood planks. In most cases enough for ¼ spacing to the wall and 1/8 spacing
between sheets. Sometimes more, sometimes less. This is recommended for
expansion although I’m not sure how it can expand much screwed down so
much.
That took a
long time and was quite painful on the knees or sitting down placing all those
screws. Maybe it was around

Figure 8 - New 15/32" plywood sub floor
I still
need to pick out the tile, the sink base and the counter top! So, this week I
expect to pick out the tile and try to make a decision on the sink base. Once
those are set I’ll make a run for the counter top and paint for the room. Trying
to match things up at least somewhat.
I still
have to fix the drywall area where the plumbing was done. Will require a bit of
sanding, taping and getting some drywall. That isn’t a problem. The difficulty
lies in the texture stuff—getting the texture similar to the existing wall. Some
practice maybe required.
All that
and more in the weeks ahead. I’m still scratching my head in how such a
seemingly little project like a laundry room can turn into such a big project
taking many weeks.
I took
Tuesday the 13th off to get things moving on the project. Goal was to
get some drywall, check out and decide on a tile and perhaps select a cabinet
and counter top. Well, I got three out of four things
done.
I first
went to the Cabinet Broker in Tigard. They sold a variety of cabinets. The
cabinet I decided on is made by Diamond which is a division of MaterBrand
Cabinets. I’m told the same cabinet maker who makes the Home Depot Thomasville
brand. I changed a few things from the original cabinet I was going to get from
Home Depot which would have cost $433.83. That was about $100 more than I was
expecting. I decided upon a simple square framed door with a Maple Opal finish
which is a light almost grey/white/pink color that should blend in with the rest
of the washing machines and keep things light. I guess we will see. Total cost
was $284 which I felt was a good price. The only minus is I got the low end
“advantage” construction which means furniture board (e.g. particle board)
instead of plywood. I’m surprised the lady didn’t quote the mid and upper range
products as well. I didn’t realize I got the lower end product until after I
left. I thought about calling back and changing it. Back at home I inspected the
rest of the cabinets in the house and they are all of the furniture board style.
So, I’ve decided to run with it. I was glad to be able to get all that done.
Now, I’ll probably have to figure out a way to get a pin nailer. Or a gun that
shoots really thin nails. Maybe my staple gun will do a good enough job there.
I’ll have to install the toe kick and the side panels.
Since they
wouldn’t take credit I paid cash for the cabinet. I should have the cabinet in
about 12-16 working days since the factory is within state and they don’t have a
long lead time like some other cabinet manufactures who are out up to six
weeks.
My next
stop took me to Home Depot to exchange some items I didn’t use/need and drywall.
After that I stopped off at Contract Furnishings Mart to look at tile. They had
quite a large selection. Also several other people, interior designers, looking
too. They were a bit busy and there wasn’t anyone offering to help or consult.
So I browsed a little bit before leaving for lunch [I later found out they will
only sell to contractors, not the general public].
After lunch
I visited three other places on the other side of town. Ann Sacks, Oregon Tile
and Marble, and one other one whose name I forget. None of these places had a
good selection for floor tile that I liked though I did pick up three samples at
OT&M. One the way home I stopped by Lowes to return another item and look at
their tile. They had some stock but nothing I liked. Most seemed like it would
require special ordering. Price was mostly in the $2-$4 range. Other places I
was looking tended to be around $4-$5 on up.
I went home
and looked up one more place. A local place called Taggart’s home interiors that
carries tile, carpet, vinyl, countertops, etc. and even does installations. They
had a great selection of tile, much like Contract Furnishings Mart but with a
lady willing to help a bit. I found a couple I liked and got some pricing. Then
I brought home some samples. My goal was to stick with tile under five dollars a
square foot.
After
taking the tiles home and looking at them I narrowed down my choices. I asked
Joylyn what she thought of my choices and she like the one I was leaning
towards. On Wednesday I returned the samples and made my purchases. I bought 90
sq ft of the $4.85 tile for a total of $436.50. The tile I got is made by
Monocibec in
Next
Wednesday evening I should have the tiles and I scheduled the tile installers
for next Thursday/Friday. So, everything should be pretty much done by the
weekend of the 23rd/24th. Perhaps I would have the paint
color selected by then and can paint the room. The next week I expect the
cabinet to arrive so if all goes well, maybe by the first weekend in August I
can have the whole project complete.
On
Wednesday I cut the drywall for the hole in the wall—to cover the plumbing. I
also cut off some of the door trim using a Dremel and chisel. I wanted to raise
the floor a little higher than the 7/8” so the tile, backboard and etc will all
fit without a problem. I estimated the mortar, backer board, and tile will be
about 7/8” inch so I gave another 1/8 to 1/4 inch for the tile guys to work.
Should be no problem now.
Today I
finished off cutting the rest of the door trip and installed the cut drywall.
Putting construction adhesive the screwing the drywall into the studs. It fit
well with a maximum of 1/4 inch gap in some areas. I taped with some fiberglass
tape and used joint compound. First coat looks pretty good. Tomorrow I’ll sand
and put on a second coat. Saturday a third and hopefully final coat. Then I’ll
need to buy and figure out how to get a similar texture as the rest of the
wall—that will be the difficult part.

Figure 9 - Hole patched with drywall and taped
Things left
to do are getting a new light, paint (and painting the room), and picking out a
counter top material and having that made—which will take about two weeks. Yes,
the project seems to drag on somewhat. And I’m not sure if I’ll have the plumber
set the sink and do the remaining plumbing install or not.
On Friday
and Saturday I put on the second and third coats of the drywall. Sunday I sanded
and took care of the texture stuff. The drywall repair and texture stuff
actually turned out pretty well although I didn’t do the best job of blending it
in with the other texture. I shouldn’t have tried to isolate the blend area by
taping it off and just used over spray. I’ll keep that in mind the next time I
have to repair some drywall. Most of the repair work will be covered by the new
cabinet anyway. Only the upper portion will show.
On Monday I
moved the laundry machines back out into the main room and wiped down the walls.
Cleaned the dust off and cobwebs. I also taped a bunch of areas to help with
painting so I didn’t paint the wood, pipes, etc.
Almost
everyday requires a trip to Home Depot.
Today I
placed the order for the countertop. I was going to go with the rounded edge,
waterfall design but decided in the end to go with the standard, generic, flat
lay. Will give me a little more counter space to place the sink. I purchased
this from Precision Countertops with a Wilsonart laminate. The size is 32 x 25
3/8” which should fit perfectly on
my 30x24” sink base. They expect this to be ready by August third (2 weeks) but
I’m hoping they will be quicker and get it to me before that weekend which is
when I expect the cabinet to arrive.
I also did
some painting today. Purchased a yellow paint. Well, very light yellow with some
orange base tint too it though very subtle. Painting didn’t go well. The
semi-gloss paint didn’t stick to well to the wall. So, I got to painting and
noticed areas where you could see the old paint and began to realize this is
going to require two coats. Oh no! More work for me. I think it is more
attributed to the previous paint being semi-gloss though. Or you could say the
other paint is darker and the new paint is too light. Either way it shows
through in parts so I’m really hoping a second coat will finish it off. I have
only a half gallon left which I’m hoping is enough. I did spill more than I care
to admit. There must be a trick to getting the paint out of the can without
getting it everywhere or running down the can that I don’t know
about.
My goal is
to have that room all finished off/painted before the tile gets installed—which
should be on Thursday morning pending the tile arrival. Almost seems like the
project is dragging on so I’m wanting it to be done soon. We will soon see how
everything goes together—tiles, paint, cabinet, and countertop. Could be
interesting.
I used Behr
paint (from Home Depot) and got the semi-gloss enamel. It cost about $22 a
gallon. I fear if I have to get another gallon it may not be an exact match so
the area I paint wouldn’t look like the same color. So, something to
avoid.
Last
Wednesday I painted a second coat on the walls of the laundry room. I had just
enough paint to make it with some in reserve if I ever need to do some touch up
painting. My job was done and I was ready for the tile
guys.
Unfortunately, of course, my tile
hadn’t arrived. This was due to a computer crash at the tile place of all
things. They had lost my order. The tile guys were slated to arrive on Thursday
and begin work. I spoke with them and they decided to get started with the 1/2"
wonder board installation early Monday morning and with any luck the tile would
arrive and they could continue.
Thursday
morning I called United Tile and found out the size of the tile I was to be
getting. It was 5/16 inch thick—between 1/4 and 3/8 inch the lady told me. The
tile guys would be able to put down 1/2 inch wonder board.
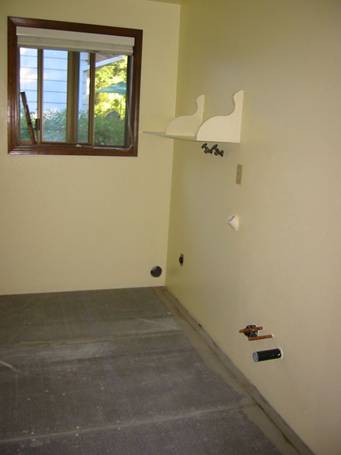
Figure 10 - Wonderboard 1/2" installed
The tile
guys arrived before
At about
Thursday
night I picked up the tile. Six boxes of 12 tiles plus 4 extra for a total of 76
tiles. Each weighed about 4 and a half pounds. Those boxes were quite
heavy—heavier than I thought.
Friday the
tile guys arrived around the same time and got started laying things out.
Unfortunately the room was such that they would have to cut tiles for both sides
since there wasn’t enough room to do full tiles across. It took them four hours
to get everything laid down and finished up. Unfortunately because it was Friday
they wouldn’t be back until Monday to do the grouting. However, it didn’t matter
much since I didn’t have my cabinet or countertop.
On Monday
one of the guys, Ted, came back to do the grouting. I selected “Earth” which is
a medium brown since I wanted a dark grout and it fit the tile well. It took
between 1-2 hours for the grout work to be done. The tile guy left some sealer
was left so I could seal the grout.
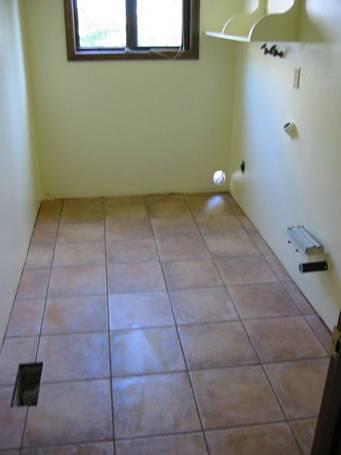
Figure 11 - Tile and grout
completed
Today,
Wednesday, I sealed the grout. Went over it twice with the sealant and a nice
bottle/paint brush tool I got from Home Depot that allowed me to do the sealing
within about 15-20 minutes.
I also
picked up my cabinet which just arrived.
Course the
toe kick and another piece was nowhere to be found. So, I’ll still have to get
those parts. But at least I can work on installing the molding again, cutting
out the holes for the plumbing and putting in the washer/drier so I can do
washes. My goal is to have all the cabinet and plumbing stuff done by mid next
week so I’m ready for the counter top. Also to have all the molding done. With
any luck I’ll have everything complete by the first full weekend in August.
Finally after more than a month. Ugh.
Last week,
when I picked up the cabinet, it just barely fit into the car. I had to move
both seats forward. When I got in the car it was kind of like driving a go cart
being so close to the wheel. I took the back roads and remained safe and did
have some bad starts and slipping of the clutch but didn’t
stall.
I suppose
it is a good thing the toe kick and trim didn’t arrive when they did since I
would have had to make another trip, or return the next
day.
Well, the
never ending project continued. Getting that large cabinet out of the car was a
bit tricky. Luckily it wasn’t too heavy so I managed to get it moved to my
living area to unbox. The construction was pretty good though I thought the 3/8”
furniture board seemed a bit thin.
I didn’t
really get started on the installation until Saturday and I only spent a minimal
amount of time then. I simply reattached laundry duct. Removed the old one which
had some difficulties staying together, painted the duct and area around the old
hole, then reinstalled and used some silicon calk around the ductwork to keep
out the air/bugs. I also ran off to get some more plumbing supplies I would
need. Shut off valves and a P-Trap.
On Sunday I
went to Home Depot for some more items. Kind of the part I don’t like about
these projects. Always having to run back to the store a couple times a week.
Will be nice when it is done. I’ll visit Home Depot about once in a couple
months then when I do a project it will be several times in a week to buy/return
stuff. Gets to be a bit much.
Sunday
afternoon I spent from about
My final
step on Sunday, after getting the cabinet attached to the wall, was putting on
the plumbing shutoff valves. I purchased the quarter turn valves after seeing
and liking them better than what I bought the other day at A-boy. Difficulty
was, after installing them I noticed drip, drip even though they were what I thought to
be very tight. A never ending battle now.
On Monday I
went to Home Depot again for a ten inch adjustable wrench to help tighten up the
shut off valve easier. I turned off the water then reinstalled the shut off
valves. Making sure I tightened a half turn this time. That
worked.
It was
Monday that the counter top also arrived. So, I picked it up and later that
evening spent a couple hours getting it cut and setup for the sink. Installed
it, mostly by eye. I think I may be as much as 1/16” off but that is because I
installed flush to wall and apparently the wall isn’t that straight. It was at
this time I noticed the base cabinet was slightly off from the tile grout lines.
About 1/8” or maybe up to 3/16” off from the grout lines. Hum, I thought. Maybe
the wall isn’t that straight after all. Wow, how could this have happened. Well,
I guess all I can say is what is done is done. All has to do with the leveling
and centering process. I leveled but then missed the centering process.
It was on
Tuesday that I worked on installing the sink drain and faucet. I ran into two
more problems this evening. One was the hoses from the sink were not long enough
to reach my shut off valves. Damn, guess we should have had the plumber raise
them up a bit. This led to me buying some extenders on Wednesday which I hope
won’t leak when installed. Basically I bought a brass fitting to connect another
9” hose. The other issues was once the sink was installed the hot/cold adjust
may end up hitting the wall. Another thing I didn’t think about. Interesting how
all the problems start coming towards the end.
On
Wednesday my friend William dropped by so we could get the sink installed. I put
a bead of calk around the edge of the counter top. Then we dropped in the sink.
Unfortunately the sink rocked a little bit. Back and forth on the corners by as
much as 3/16 of an inch. What! How could this happen. I asked Williams thoughts
and we decided to remove the sink and figure out the next step. I cleaned up all
the calking and we reinstalled the sink without any calk to see the fitting.
Yep, it does seem to be a little warped. My countertop is pretty flat after
checking with level and t-square. So, the project is pretty much on hold now
until I can determine a solution or exchange the sink.
So much for
things going smoothly. Not sure what happened there and really wish this project
would be done with by now. The sink is 90lbs and cost over $300. You would think
there might be some Q/A at the factory to check things like this. Or maybe it is
normal and I just have to add more calk around that corner. Ugh. It just isn’t
easy installing and reinstalling.
I am
finally done with this project.
On Thursday
I called and requested an exchange for my sink. On Friday, the 6th, I
picked up the new sink. Struggled to get it out of the car but made
it.
On Friday I
recall putting up the final molding around the cabinet and kick plate. I also
put down some weather stripping and the kick plate to the garage door. I just
used the old metal kick plate and it fits well. No need for any
changes.
On Saturday
I worked on finishing the moldings in the hallway and getting the carpet to
match up with the tile. Used wood putty to fill the nail holes. So, by the end
of this day all was pretty much done expect for the sink install. On the new
sink I placed the faucet and drain strainer.
Sunday Todd
came over and helped me place the sink. We were brave and put the calking down
and dropped in the sink. This time it fit, no rocking. Yes. I cleaned up the
extra calking and then let the sink settle into place.

Figure 12 - Silicon caulk to seal/hold
the sink in place
Monday
morning I put up the back splash with some construction adhesive and put some
more silicon calking on the edge where it meets the countertop.
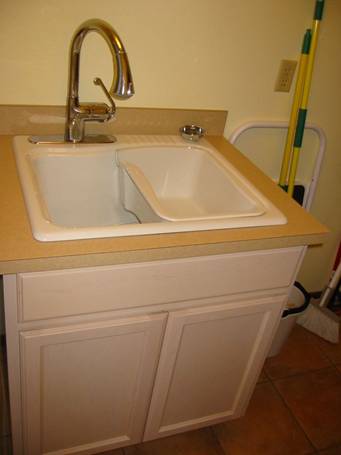
Figure 13 - Sinke and Cabinet
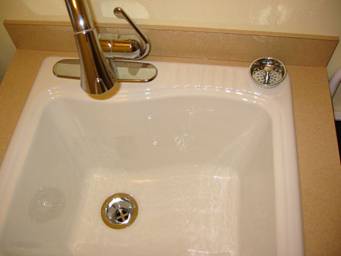
Figure 14 - Close up view
Monday
evening I finished attaching the rest of the faucet, and attached the water
lines to hot and cold output. Finally it was time for the P-Trap. That went
fairly smoothly after cutting all the plastic—luckily to the correct lengths.
Waited for some of the glue to dry, made sure all was tight and tried it out.
Everything working and no leaks. Course I’ll check things out tomorrow and maybe
even shut it off as I depart on a much needed vacation. On the good side is this
project is done so I won’t be thinking about it and when it will be finished on
my vacation.

Figure 15 - P-trap and hot/cold
connections
Three years
ago I had an idea for a utility sink and now I’ve got one. Only about two months
after I made the decision to purchase the sink to kick it all off. Well, two
months and three thousand dollars later. Nice project to keep me busy on several
weekends and many weekdays. Nice to have it completed. It turned out pretty well
and gave me a new shot of confidence that I can tackle a big project like this.
Don’t be afraid. Don’t be lazy. If it is something you want to do, start
planning and dig in. Get it done and get that monkey off your back. Will be so
much better when you can walk in and admire your completed project. Ah, good to
be done.

Figure 16 - Completed laundry room
Well, the
project is finally done and the finally cost are in. Right at three thousand
dollars is the cost. There are a couple things I left out, like a level which I
can use for other projects, and some items I left in which I can still use on
other projects like a wrench, left of adhesive/caulk, and a pipe cutter. So, the
finally costs are approximate plus or minus about a hundred dollars. Money well
spent to have things the way I want them, plus it will add a couple thousand to
the value of the house. Eventually I suspect I’ll put in a new light fixture
some future weekend when I feel like spending some money and see something I
like which will fit the rooms colors. That should only add another fifty dollars
give or take to the project.
The
toughest part in all of this was getting started and spending the time to do all
the research on what I wanted who could do the plumbing, who could do the tile,
and picking out everything. Lots of choices out there so if you have helpers or
someone who can make up their mind quickly a similar project should run a bit
smoother/quicker than mine. Good luck with your
remodeling.