|
When I bought my house the inspector mentioned there was some water under the house. He also noticed a water line (i.e. dirt level) that went pretty high up under the house. A rotted support pillar and some erosion were other telltale signs that this needed attention prior to purchasing the home. Because of this my real estate agent was able to convince the previous owner to put in a sump pump and some drainage under the house to take care of the situation. However my real estate agent mentioned I may want to put in a French drain or another type of drainage around the foundation to keep the water from going under the house. After buying the house I considered doing this in the Spring but there didn't seem to be a problem around the house with water. Then again, it didn't rain a whole lot in the early part of 2001. At least, not as much as it normally would. So, I decided not to concern myself with all the digging.
Flash forward to the end of the year. It rained about five to six inches in each of the last two months of 2001. Both my rain drains were overflowing (apparently clogged) anytime it rained more than about a quarter inch in a day. The situation didn't look good. I called on Roto-Rooter, with an hourly fee around $90, and they tried but were unsuccessful in unclogging the drains. In one of the drains the snake appeared to go about 30ft and then hit something (root). The other drain a joint was reached and the plumber couldn't go any further. The next good rain a couple days later was when I learned Roto-Rooter didn't help. I had several inches of water collecting next to my foundation. Unfortunately the ground around the back of my house slopes towards the foundation.|
|
|
|
The land has a gradual slope towards the edge/corner of the house. In the crawl space, which is about another two feet lower than the vent space, I can see where water has seeped in and left a water/erosion trail. The real fix here is to repair the rain drain to not allow flooding to occur. I decided to install a French drain for backup and to try to reduce any water pooling during heavy rains.

|
|
|
This picture is the south edge taken from the back of the house. The land is not graded very well here causing much of the water to flow back towards the house. My solution was to fix the rain drain and dig a French drain to help reduce/remove any standing water. Basically, if I forget to clean the gutters and they overflow the French Drain should help keep the water from pooling and going under the house.

|
|
|
The roof run off was going into the clogged up rain drain and pooling around the back of the house. Eventually enough water seeped under the foundation and into the sump pump "well" area that the sump pumped turned on and pumped even more water out. The low point is right near the hose so most of the water pooled right around there. Eventually, if enough water accumulated (perhaps three inches) some water would begin making its way downhill towards the back of my yard.

|
|
|
Here, I suppose, would be your classic case for having a French drain--removing standing water. Because the slope of the land goes towards the back of the house the rain drain overflow did not affect this area much. However, some rain does drip off of the roof and that contributes to the puddles seen. Unfortunately the neighbor has a gutter which needs attention. The gutter is overflowing every time it rains! The puddle it creates is somewhere around three to six feet in diameter. Recently it rained enough for the puddle to extend onto my property, bypass my French drain, and make its way to my auxilary drain near my faucet. Unfortunately the eroding water took a lot of barkdust with it and clogged that drain.
I considered asking the neighbor if he wanted to tap into my French Drain but when I mentioned this when getting a permit I was told there would be a problem with the easement and a special permit would be needed for that. So, I dropped the idea.
TAKING ACTIONI did the only thing I could. I borrowed a pick-axe from a co-worker and began to dig a trench. I trenched a new route for the rain drains. This would allow any overflow from the existing drains to the end of my property beyond my fence and eventually to the creek about ten feet from my fence. Lucky for me most of the run is down hill.
So began my quest to install a French drain and reroute my old rain drains.
After a few days of digging and shoveling dirt around, I now had holes for about 60ft of French drain and another 60ft of rain drain.
In my digging adventures I was able to uncover some of the old rain drain. A bit later than I had hoped but better late than never. Because of this I used most of the existing rain drains and just repaired the sections that had some problems-this included a couple joint areas and replacing the downspout section for both rain drains.
During my research I found out how to properly construct a French Drain. My original intention was to run the French drain in the same trench as the rain drain, using gravel the entire distance.
Before doing any more I decided to check with the city codes to see if I needed to get a permit to work on my rain drain/French drain. Sure enough they required one! Course they also require a permit to replace a Garbage disposal, change a sink, etc. Amazing. Seems like you need a permit to do anything. I didn't get one to change out my garbage disposal so why should I get one for a French drain I thought? I figured I better inquire against the better judgment of my co-worker. Keep in mind, at this time I was going to run both a French Drain and rain drain in the same trench with gravel.
The first person I called said I would need a permit for the rain drains and French drain. Then he talked about the French drain "code" requirement. That the black corrugated pipe required gravel 6 inches on either side as well as the top and 4 inches below the pipe! That sounded outrageous to me. That would require a trench about 16 inches across and at least 13 inches deep. And don't forget about the grade or slope of the land. This would mean at the end of the run it would probably be a few inches deeper than 13 inches. I was also informed the 2729 perforated pipe did not meet code. That same day I had some pipe delivered from Home Depot. Lucky for me it wasn't 2729. The pipe I received was ASTM F-810 - Polyethylene. I was never able to get back in touch with the same person I spoke with in order to see if the pipe was okay. This same individual said these figures were per the manufacture's spec and if I used another pipe I would have to follow the manufacture's specification. Well my pipe didn't come with instructions and it seems like everyone has an opinion on how these French Drains should be constructed. When I told this same guy about a creek behind my house he said I would have to get approval on a termination point to see if I can drain the water at the end of my property. The more questions I asked the further I dug myself into a hole. I figured perhaps I should have listened to my co-worker.
About four phone calls and a day later I was able to obtain that approval. It wasn't easy though. So, after all of this calling around and giving my name/number/address I was now pretty much committed into getting a permit. Hell, they could drive by and perhaps fine me or tell me to tear it apart. I didn't want that. And the restless nights began: Is my pipe okay? When I don't go 6 inches across and up with gravel what will happen?
I went to get my permit about 30 minutes prior to the office closing. I spoke with one person who offered me a lot of advice and it almost seemed he wondered why I would bother getting a permit.
We talked for about 20 minutes and he suggested I run the French drains into the rain drains. And if I did this I would have to use a backwater valve. He said this would be better because it would limit the amount of gravel/rock to haul. I agreed with him and decided to go this route to make my life easier. He also informed me the rain drain connector had to be 10 inches above ground level-another building code. He seemed to be okay with my perforated pipe idea and 2" of gravel on either side. So I got the permit for $92.88 to be legal.
Course, with this new idea on construction I now had a lot of extra PERF pipe I was going to need to haul back to Home Depot. And 10ft pipes don't fit very well in my vehicle.
THE LUCK OF DIGGING IN THE RIGHT PLACES
It is interesting what you'll find doing enough digging in the back yard. I was able to uncover both rain drain termination points (right near or past my fence). I was even able to find a leaky joint which was probably the result of the Roto-Rooting machine. The leaky joint was discovered when my sump engaged and tried to pump more water into the overflowing rain drain. I was
out in the back when I saw the overflowing happing again. I also noticed some water bubbbling up from out of the ground. So, I started digging. About fourteen inches later I hit the pipe where the water was leaking out of.
I discovered lots of bugs under some type of plastic which looks like it could have been a car mat at one time or another. I tossed a shovel full of them over the fence-many pill bugs. The other hundred or so scurried off. One or maybe several large reddish scary looking bugs with pinchers (like a queen silver-fish) also was hiding amongst those pill bugs. Ugh. I also dug up a lot of earth worms. Pretty much destroyed my back yard with trenches.
I discovered where the home owner put in a fence post and tried to repair the rain drain they broke with some metal substance-all rusted out. Didn't do such a good job. I imagine that other parts of this original rain drain may have similar breaks. I hope not because I decided to utilize it once I unclogged it.
Much of the old piping is of the PVC 3" type. Probably the 2729 mentioned above. It still works but seems to be quite a bit weaker. Many of the connections I came across were not even glued! ABS pipe was used at the beginning and end of the pipe runs probably because it handles the sunlight better. I suppose they limited the ABS runs because it is two to three times more expensive than the PVC or Polyethylene pipe.
I spent quite a few days on this project and in the beginning I noticed it was taking me a lot longer than I imagined it would to complete the project. I suppose this is how it always goes. Too often I turn what should be a small project into something very large and complicated.
PROJECT COMPLETION
It ended up taking me the better part of nine days to complete the whole rain/French drain project. Lucky for me it only rained once these nine days in December here in Portland, Oregon. And that one day of rain, right before my inspection, helped me discover and fix a problem before covering everything up.
Finding the original rain drain termination points helped simplify the project. While trying to dig the trench deeper on the south side of the house at the fence near the end of my property I hit the ABS pipe. I went to the other side of the fence and had to dig down a couple inches. Right in front of the end of the pipe was a root about one inch thick which the plumber must have been hitting. I cut the root and pulled some stuff out of the end of the drain before forcing water down the drain. After a few minutes the water unclogged the drain and I was left with a very muddy area. Because this drain outlet is lower than the surrounding ground I connected a ninety degree connector on the end. I also surrounded the drain with gravel and some cement stepping stones in attempt to keep the people who maintain the area behind my house from covering the drain again.
This picture shows the French drain pipe terminating directly in front of back yard fence. I put a 45 degree connector at the end and the resulting water will drip onto a tile
and gravel eventually making its way to the creek. Just behind the fence is the original rain drain termination point. It is slightly above ground level and is surrounded by
gravel and cement stepping stones. The outlet is covered by a drain grate.
Towards the north side of the house the outlet appeared to go into/around a tree. I decided to cut the pipe in the trench to see if rerouting it would help. Once the pipe was cut I pulled the terminating end of the pipe and it came right out. The pipe end was about twelve inches long and terminated right before the tree perhaps six inches under the ground! Once I rerouted to the end of the fence and checked the route using a hose/water I found the old rain drain to be working properly so I decided to use it as well.
There are two pipes in the picture above. The longer one comes from the original rain drain. The shorter one, just peaking out of the cement stepping stone, is from the
auxiliary drain which is near the faucet. This was going to be the new rain drain had I not discovered and fixed the original rain drain pipe.
I used ten foot perforated pipe I purchased from Home Depot. It is a ASTM F-810 Polyethylene pipe with two 5/8" holes spaced about 120 degrees apart. And these holes occur every eight or so inches along the length of the pipe. The outside of the pipe is white with the inside being black. The holes for the pipe were dug an average of twelve to fourteen inches deep by about twelve inches across. I used landscape fabric in the trenches to keep the soil from clogging out the drain. I used 3/4 - 1 1/2 inch crushed drain rock. I was considering the usage of river rock but wanted the ground to be stable when walking on it and felt the round river rock might lead to a walking on marbles type feel. I had three yards of rock delivered ($99) which ended up being about a yard too much (tough on the hands/back).
About two yards of this ended up in the ground. The remaining yard I hauled to my back yard and made a place for it so to speak.
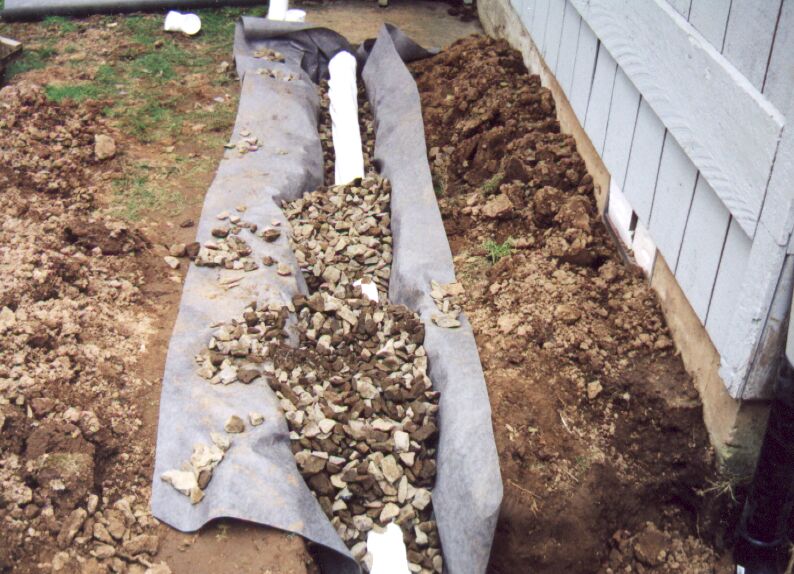
Construction--rock, pipe, fabric--is complete in this picture minus burial. Eventually grass will be planted over the drain.
Construction is in progress. First I dug the hole, then installed the fabric. Next rock was placed in the hole. The difficulty in this section was
making the grade/slope. At the far end the pipe is at ground level. At the near end it is perhaps ten inches below ground. At certain points
the pipe may in fact level out but overall I did my best to achieve at least a 2% grade.
I had two yards of soil-mix and two yards of hemlock bark dust delivered (at the same time) for $101.
Since I had trenches already dug I decided to use them for the French Drain. Course, my original plans kept changing as the project progressed. First, I was going to use the original rain drain as well as an auxiliary rain drain with the auxiliary rain drain also connected to the French drains. What ended up happening is I connected both of the French drains together and ran them in a solid ABS pipe to the back of the yard where they outlet just above and around the original rain drain.
Interesting construction here: I had to use a Y connector, a 45, and a 22 to make this work. To join the ABS (black) to PE (white) pipe I used a 3" rubber adapter
which sells for around ($4 a piece). You put them on and screw them tight with a screwdriver. Works great. You'll notice some wire running along side the pipe. This
was done to meet the city code for rain drains so if these ever needed to be dug up someone will be able to use a meter to follow the tracer wire and find where the pipe goes.
On the back South side of the house I put another French Drain. The reason for this drain is in case the gutter overflows and with all the fur trees and cones around it is pretty much guaranteed to overflow if I forget to clean the gutters once or twice a year. The grade of the yard didn't favor me when I put in the perforated pipe. On the end near the deck/cement slab the pipe sits about 1" from the top of the ground in order to make/get close to the 2% (quarter inch per foot) slope. In some places I easily met this grade while in others the pipe may be damn near level. But, with a little forward momentum the water should flow out the pipe given enough accumulation of water.
With water coming off the roof there was a bit of standing water on the north side of the house. I figured the best cure would, again, be the French drain.
On this side I was able to tie into the original rain drain because I was able to meet the grade and use a backwater valve.
I had to make the back water valve accessable for posible cleaning. So, that is why there is a hole in the ground. The round green item
is the lid (ten inches in diameter). Around the vent I left exposed rock so water could get into the drain and away from the house quicker. I'm told a true
French drain wouldn't be covered.
After the backwater valve the water will flow downhill at perhaps a ten percent grade. This keeps any possible standing water in the rain drain from
reaching the backwater valve. To the right is where the sump pump connects to the rain drain. To the left and under a tree root is where I connected
to the original rain drain. I couldn't figure out where the white pipe going towards the top of the screen went. It seemed like it somehow connected to the rain drain
on the North side of the house. But, it seemed like it was more of a secondary drain. I tried using a hose to prove this drain's run but was unable to draw any
conclusions other than some water flowed towards this direction.
Since I had the trench already dug for the rain drain I figured I would drop in a pipe as a possible backup. But, until that time I figured I'd put in a little drain right near the water faucet. Plus, if the gutters ever overflow this tends to be the low spot of the yard so I'm hoping it will keep the water away from going under the house.
So long as this drain doesn't become clogged it will work great. Several inches of rain over a couple day period and the neighbors gutter problem proved this. Course,
I never actually saw the water pooling all I saw was the signs of erosion and a clogged drain.
The inspector arrived late Friday morning after I called the day before making an appointment. The only things I needed to do was fix the backwater valve problem and run some 18 gage tracer wire along the pipe in case it ever needed to be dug up it would be easy to find. No re-inspection was necessary. Hopefully this doesn't cause my property taxes to increase. Another of my co-workers mentioned that as a reason cities want you to get a permit. Personally I feel the process was educational and worth the extra effort. Hey, at least I know I'm up to code.
All the digging and shoveling of rocks, dirt, and bark dust took a toll on my hands. It has taken several weeks for they to fully recover. So, if you think about tackling a project like this it may be wise to consider recruiting volunteers.